How to build a pedigree chart
The pedigree builder turns a family history into a standardised clinical chart by recording people and the relationships between them. You add one individual, then grow the family outward from whoever is selected; the tool assigns generations, positions, and pedigree identifiers automatically and renders the symbols. Clinical status, genetic findings, and reporting detail are layered onto each person afterwards.
This page is the build workflow, in order. It assumes the notation itself is defined elsewhere; for symbol meanings see the pedigree standards reference.
How the builder thinks
The chart is not drawn, it is derived. Every action operates on the selected person and creates a relationship: a parent union, a partnership, a child, a sibling, a twin. From that graph the tool computes generations, left-to-right order, and identifiers, then draws the lines. You record meaning; the layout is a consequence.
Two practical results follow. First, build structure before appearance: get the relationships right and the diagram organises itself. Second, recorded truth and displayed appearance are separate. A person’s clinical status is the record; a display override only changes the fill. When the two disagree, the tool flags it rather than silently choosing.
1. Start with the first individual
On an empty canvas, click Add the first individual. A diamond appears, selected, with no status. Anchor on whoever makes the family easiest to enter, usually the proband or a convenient founder. The point now is to have something selected to build from.
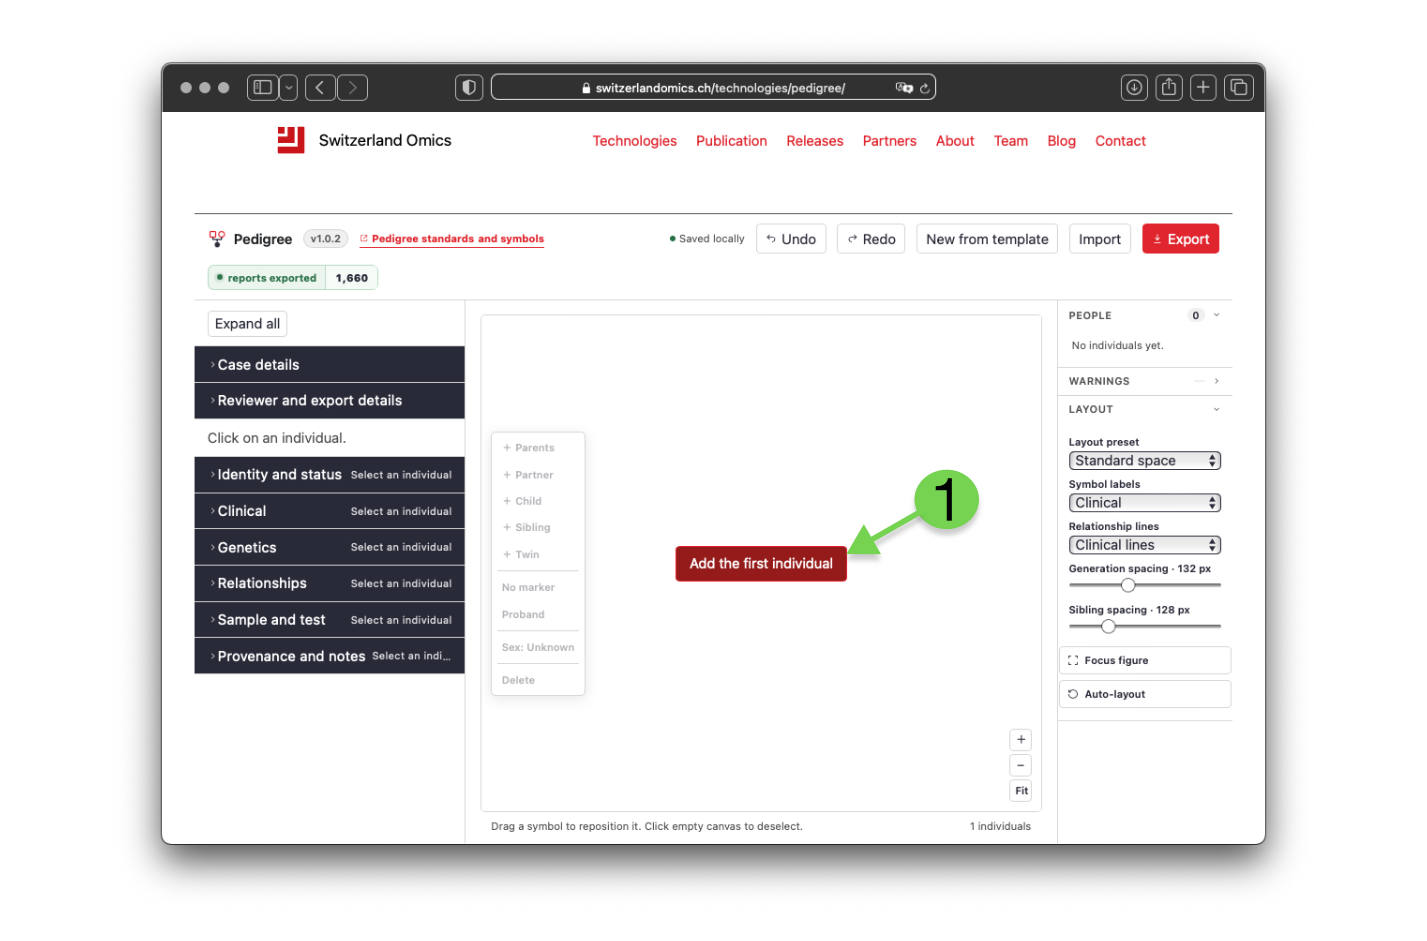
Figure 1. An empty canvas. Everything begins by adding one individual.
2. Set the sex and identity
The first individual appears as a diamond, selected. Set its sex before building outward: the Sex toolbar button cycles the symbol through male (square), female (circle), and unknown (diamond), or you can set it precisely in the inspector under Identity and status, along with a display name and, where used, a pedigree ID override and sample ID.
Sex is structural, not cosmetic. It drives the symbol shape and the inferred paternal or maternal role used on parent lines and on export.

Figure 2. The first individual, selected. The Sex button cycles the symbol between male, female, and unknown.
3. Grow the family from the selection
Select a person, then add relatives relative to them. Use the floating toolbar or the keys:
- Parents (P) — adds a father and mother and makes the selected person their child. Disabled once parents exist.
- Partner (R) — adds a partner and a relationship line.
- Child (C) — adds a child under the selected person’s partnership, creating a partner if none exists.
- Sibling (S) — adds a sibling under the same parents, creating parents if none exist.
- Twin (T) — adds a twin in the same sibship and groups them; set zygosity later.
Work outward one relative at a time. Adding parents creates a new generation above the anchor and renumbers it, so an individual labelled I-1 becomes II-1 once parents exist.
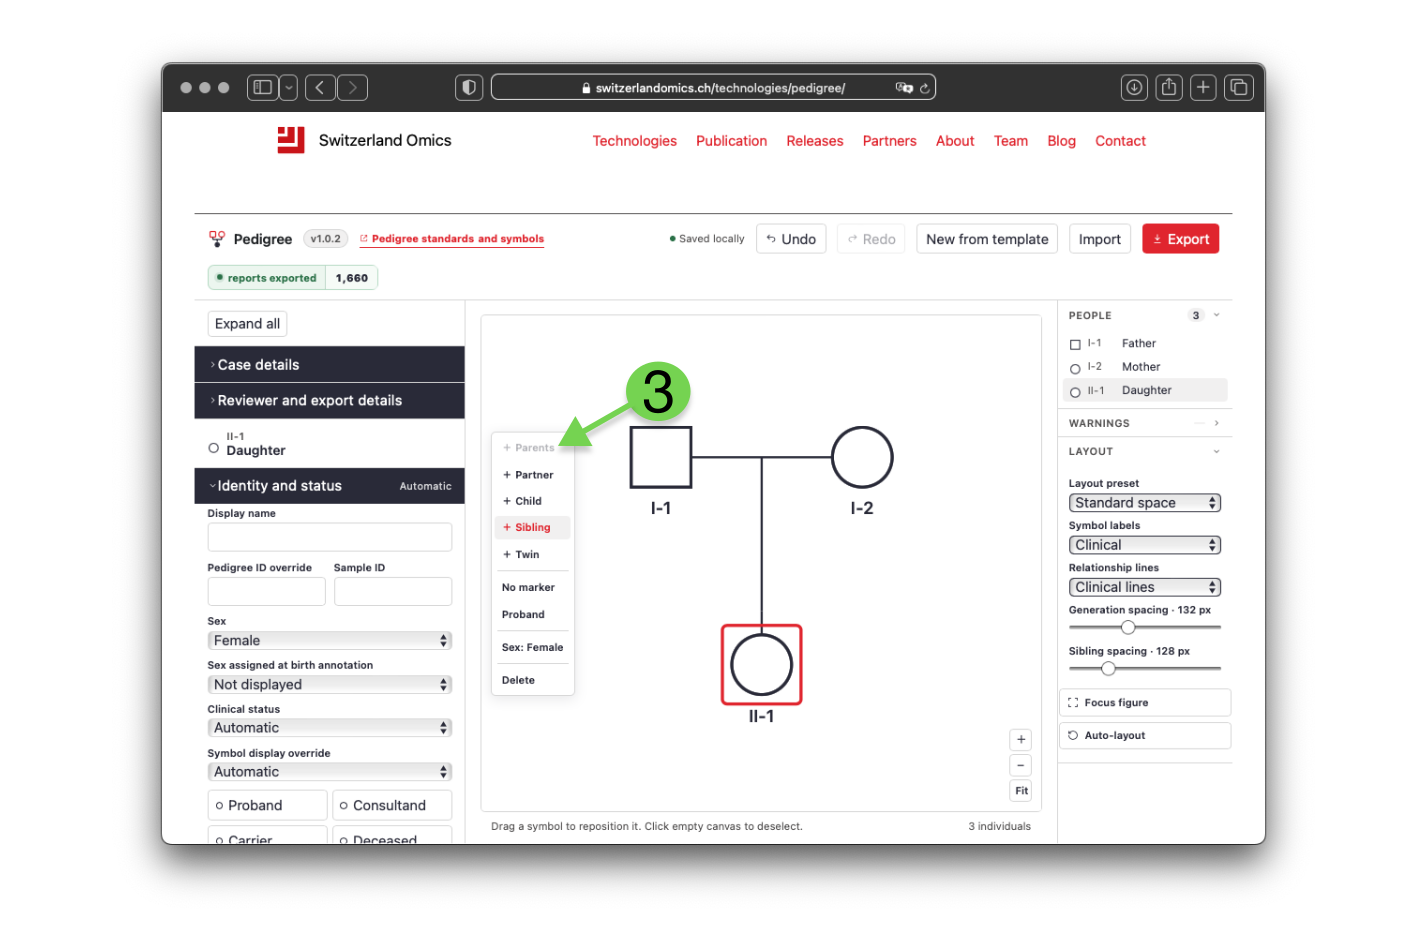
Figure 3. Parents added to the anchor. A new generation appears above, the anchor is renumbered to II-1, and the Parents action is now disabled because parents exist.
4. Mark clinical status and the proband
Set Clinical status in the inspector (affected, unaffected, unknown, not assessed, or automatic) — this is the recorded value. For quick visual marking, the Affected toolbar button cycles the fill through affected, carrier, compound heterozygous, and none. Mark exactly one proband with the Proband button; use consultand for the person being counselled when that is someone else.
A filled symbol means affected for the condition in the legend. Leave a symbol unfilled for unaffected and use the unknown state, not an empty symbol, when status is genuinely unknown.
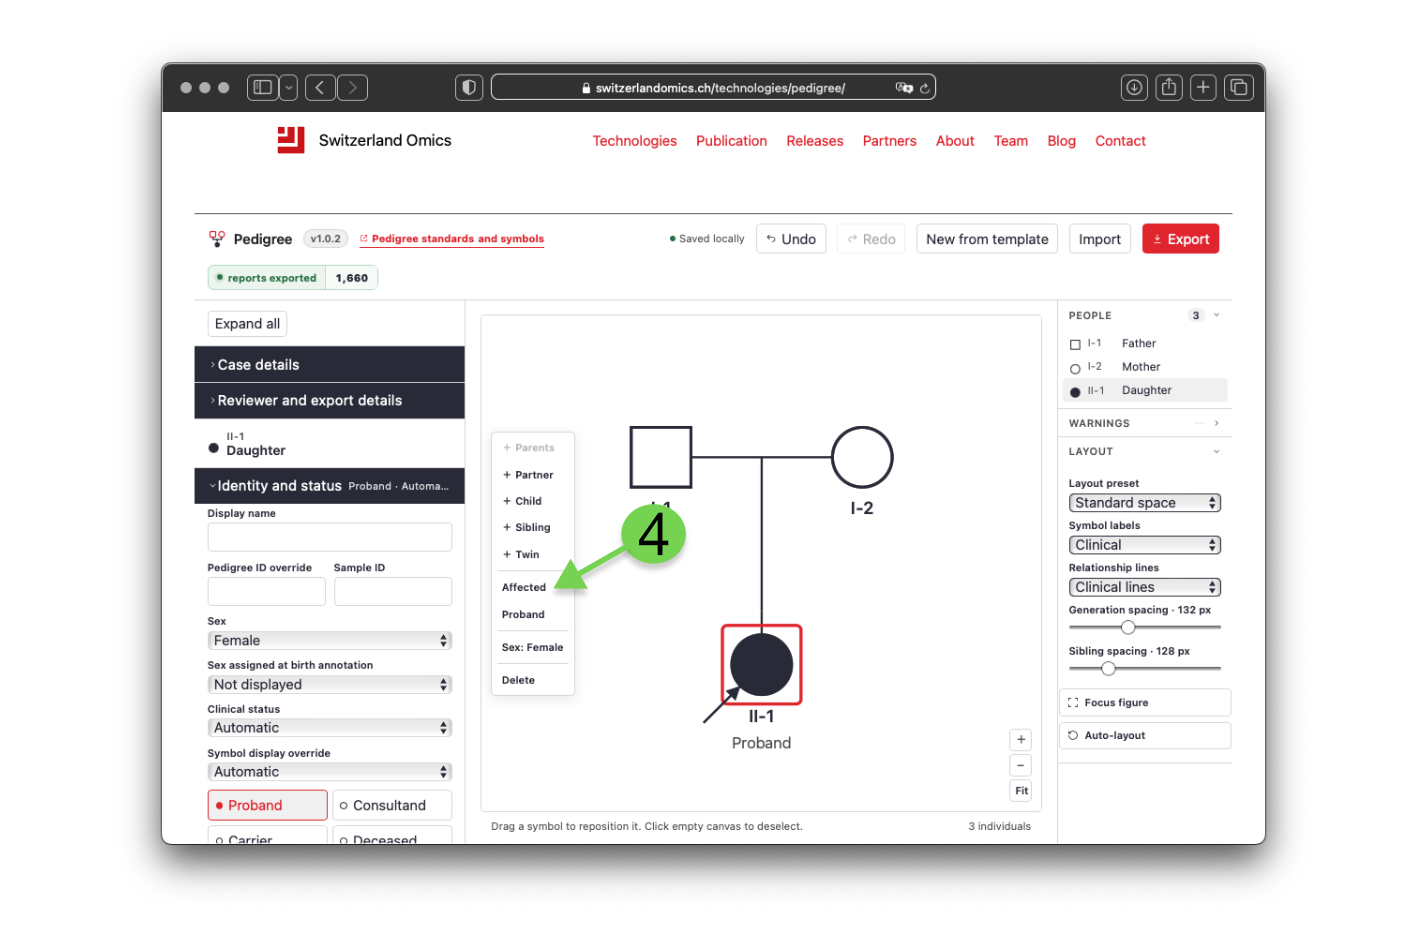
Figure 4. The proband marked and filled. The Affected button cycles the fill; the Proband button draws the arrow and adds the label.
5. Record vital and clinical detail
Toggle Deceased and record birth year and age at death; the symbol gains a diagonal line. Under Clinical, record the key phenotype, age at onset, and diagnosis. Keep entries concise; they appear under the symbol depending on the label preset and in the report.
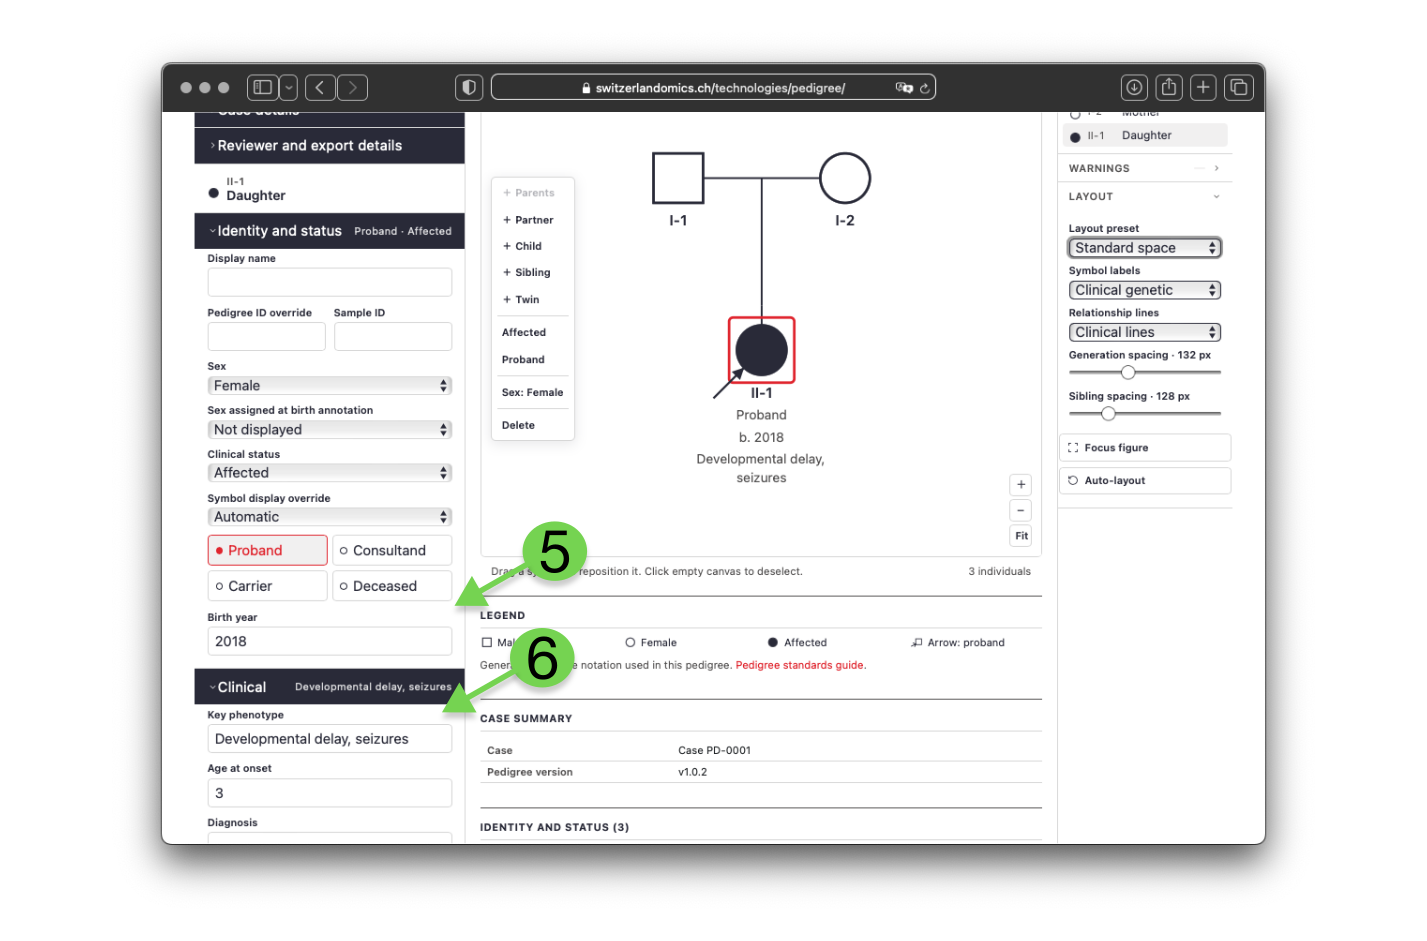
Figure 5. Vital and clinical detail recorded. Birth year, phenotype, and age at onset now appear beneath the symbol.
6. Record genetic findings
Open Genetics. Each person supports up to five variants on separate tabs. Per variant, record gene, transcript, the HGVS levels you have (genomic, coding, RNA, protein), genomic coordinates and alleles, zygosity, inheritance, phase, and classification.
For a carrier or a compound heterozygote, set the Symbol display override to the carrier pattern or compound marker, or let it follow the recorded zygosity. A second variant marked compound heterozygous with cis/trans phase or reciprocal parental origin is what distinguishes a true compound heterozygote from two unlinked findings; the tool asks for that evidence before it stops warning.
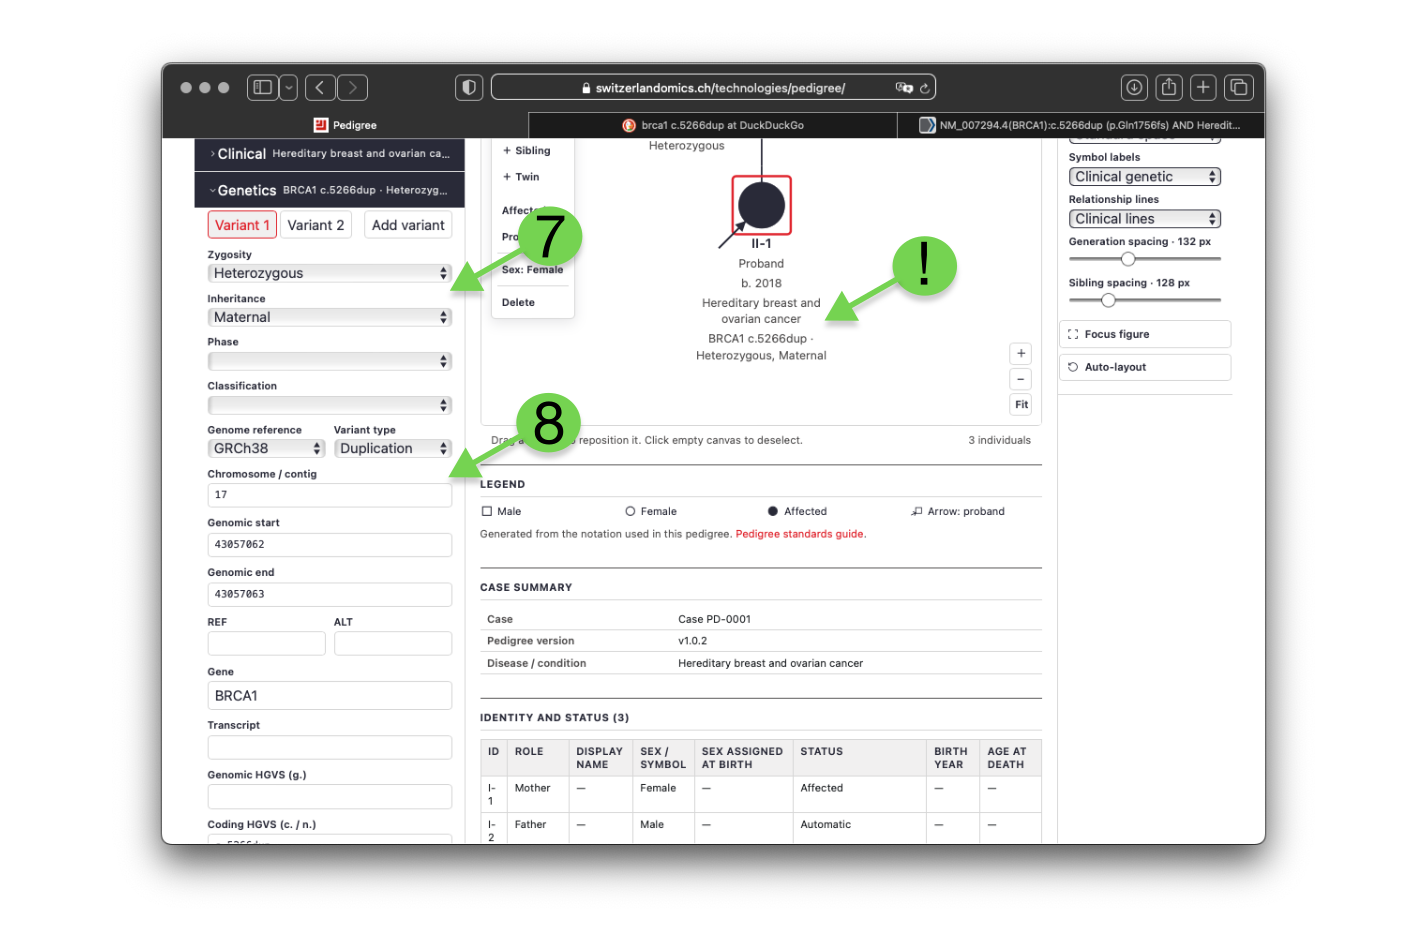
Figure 6. A variant recorded on the proband. The variant summary appears beneath the symbol once the clinical-genetic label preset is selected.
7. Add the special relationships
In the Relationships card for a person’s union:
- Consanguineous draws a double line; state the degree when it is not obvious.
- Relationship status: ended draws a slash through the line.
- No children adds a terminal bar; infertility adds an annotation and reason.
For twins, select one twin and open the Twin section to set monozygotic, dizygotic, or unknown; the change applies to the whole twin group. For multiple partners, select a person and add another partner to create a second union. Children connect to the partnership they belong to, which is how half-siblings stay attached to the correct parents.
8. Gender identity and sex assigned at birth
Use the symbol that matches gender identity, and record sex assigned at birth as an annotation (AFAB, AMAB, UAAB) in the inspector. The annotation appears under the symbol with the clinical, clinical-genetic, or technical label presets. Do not attempt nested square-and-circle symbols; the builder does not use them.
9. Relationships
Relationships are managed by selecting an individual then setting the partner or offspring details from the menu. Infertility and other features may be relationship-specific and therefore appear in this section.

Figure 7. Relationships are managed by selecting an individual then setting the partner.
10. Add the case metadata
Open Case details and Reviewer and export details: disease or condition, referral indication, reviewer, institution, and date. These populate the case summary and the report header and are part of the clinical record, not decoration.
11. Clear the preflight warnings
The navigator Warnings section and the status pill separate conflicts from review items. Conflicts (for example, a proband marked unaffected, or a compound marker without compatible zygosity) should be resolved. Review items (affected without a phenotype, de novo without recorded parental testing, an incomplete REF/ALT pair) should be checked. Finish the data before finishing the picture.
12. Lay out and present
Only now adjust appearance. Choose a layout preset (compact, standard, spacious) and fine-tune generation and sibling spacing. Pick a label preset: minimal shows identifiers only; clinical adds names, ages, and phenotype; clinical-genetic adds variant summaries; technical shows coordinates and HGVS. Keep routing on clinical lines for orthogonal descent. Drag a symbol to pin it, use Auto-layout to release all pins, and press 0 to fit.
13. Export and exchange
Use Export and choose the output: SVG or high-resolution PNG for a figure, PDF for the print report with figure and tables, or native JSON, FHIR R4, and PLINK FAM/PED for data exchange. JSON preserves the complete project; FAM and PED reduce clinical detail to a single PLINK phenotype and rely on the parental roles stored on each union.
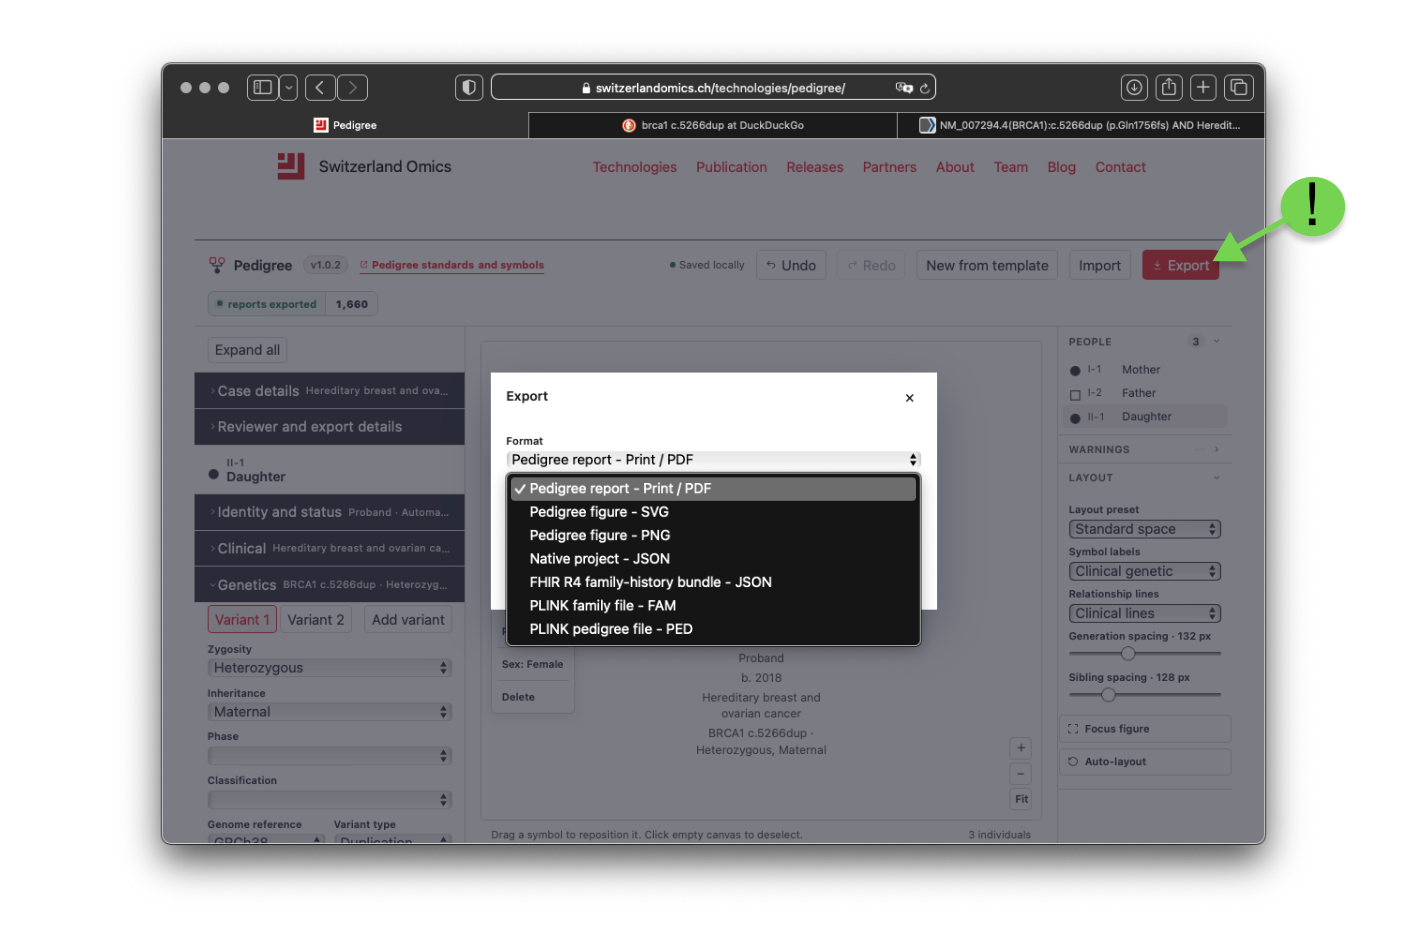
Figure 8. The export dialog. One project can be saved as a figure, a report, or a data-exchange file.
Exchange runs both ways. Use Import to reload a native JSON project, a FHIR R4 bundle, or a PLINK family; a native JSON or FHIR file exported here re-opens with the full pedigree intact, which makes the format a durable record rather than a one-way render.
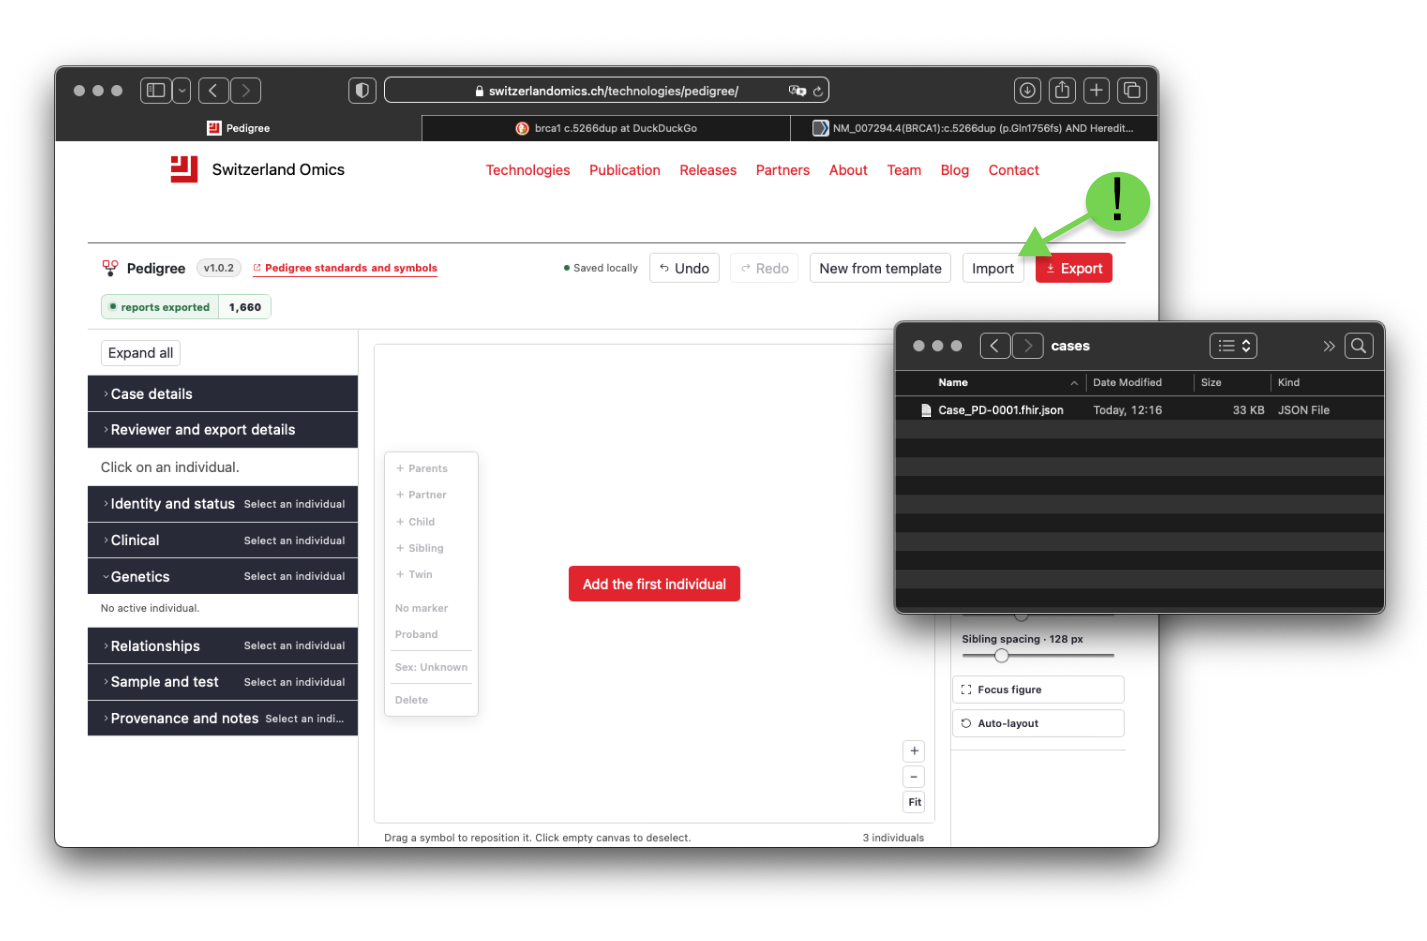
Figure 9. Importing a previously exported file. Native JSON, FHIR R4, and PLINK families all load through the same Import action.
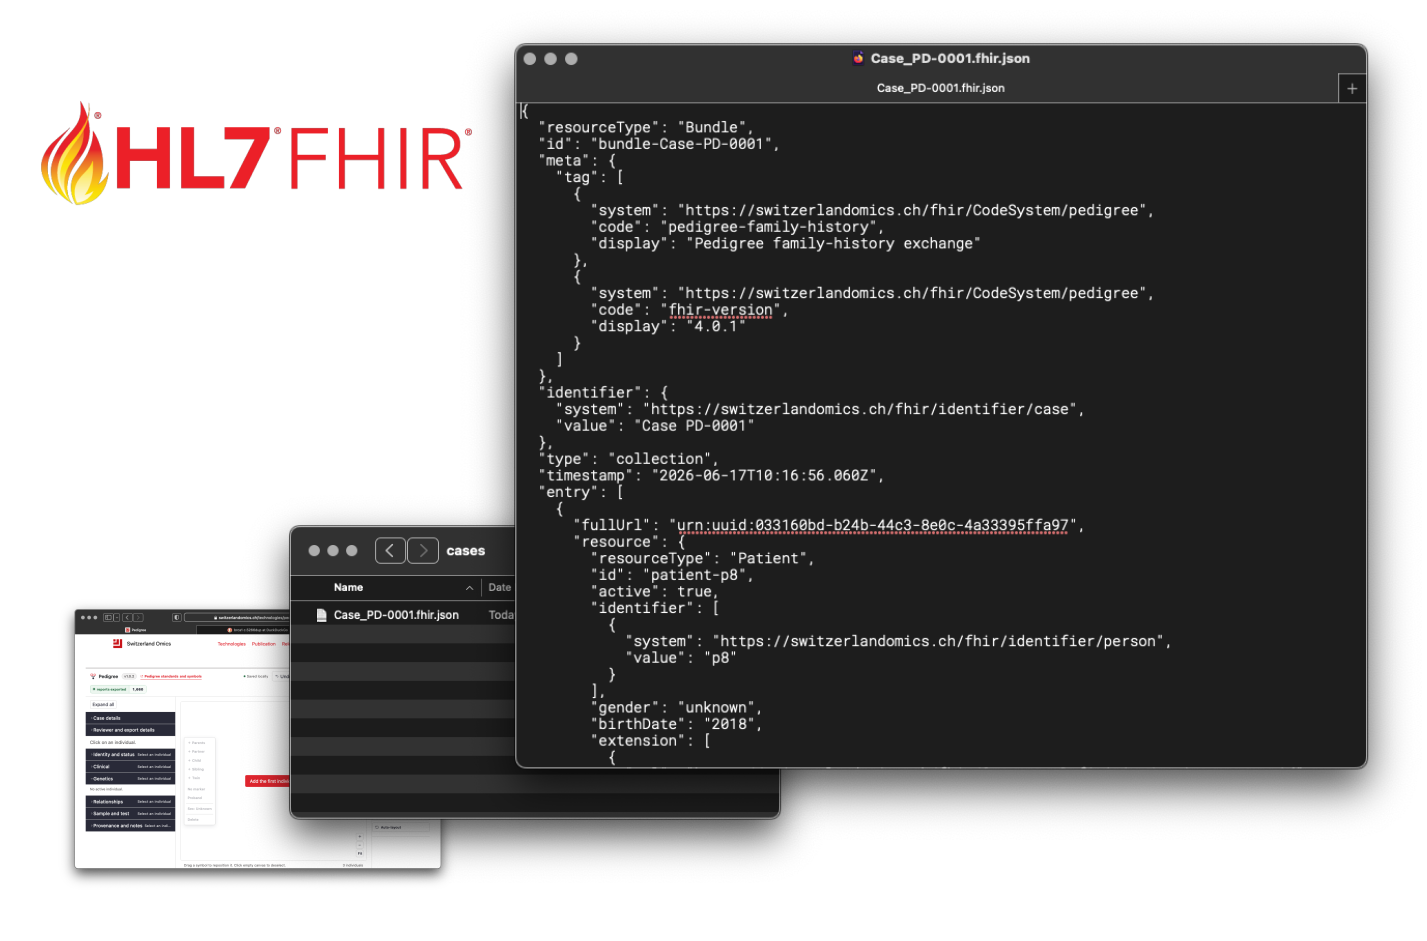
Figure 10. Under the hood, the contents of a FHIR compatible JSON file.
Keyboard shortcuts
| Key | Action |
|---|---|
| P / R / C / S / T | Parents / partner / child / sibling / twin |
| D | Toggle deceased |
| Delete / Backspace | Delete selected |
| 0 / + / − | Fit / zoom in / zoom out |
| Ctrl or Cmd + Z | Undo (add Shift to redo) |
Common mistakes
- Placing relatives before selecting the person they relate to, so they attach to the wrong union.
- Leaving a symbol unfilled to mean unknown; use the unknown state, since unfilled means unaffected.
- Forcing a fill with a display override that contradicts the recorded clinical status, then ignoring the conflict warning.
- Recording two variants as compound heterozygous without phase or parental-origin evidence.
- Polishing spacing and labels before the relationships and warnings are settled.
- Omitting age at diagnosis on affected relatives, which the report cannot infer.
What the builder does not draw
The builder implements the core symbol set and the relationship types above. Pregnancy outcomes, adoption, assisted-reproduction donors and carriers, and multi-condition quadrant fills are part of the full nomenclature but are not drawable here. Represent them in annotations where needed and consult the standards reference.
Related pages
Reference
Bennett RL, French KS, Resta RG, Austin J. Practice resource-focused revision: standardized pedigree nomenclature update centered on sex and gender inclusivity. Journal of Genetic Counseling. 2022;31:1238–1248. https://doi.org/10.1002/jgc4.1621